
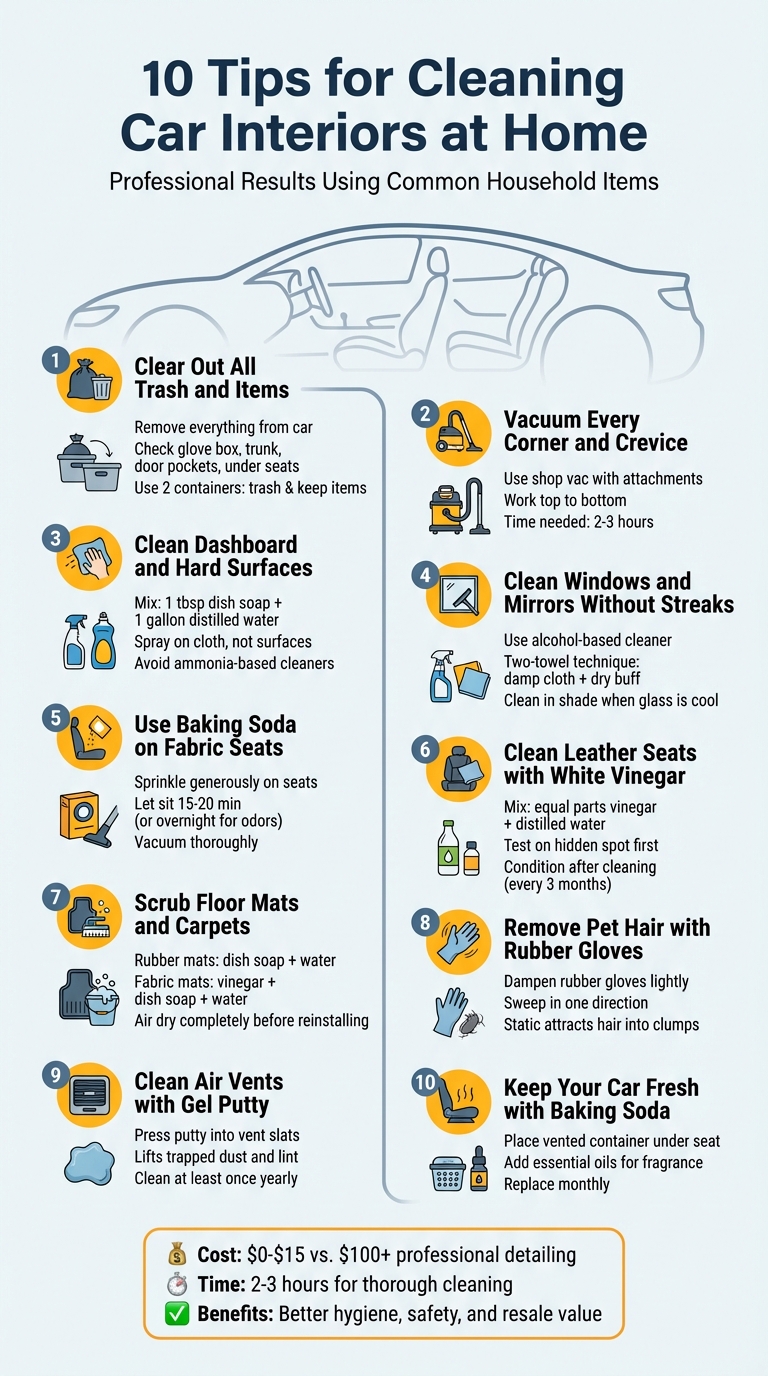
Want a cleaner car interior without spending a fortune? You can achieve professional-level results at home using common household items like baking soda, vinegar, and microfiber cloths. Here’s a quick summary of the steps:
- Remove all trash and clutter for easier cleaning and better safety.
- Vacuum every corner with the right tools to pick up dirt, dust, and debris.
- Wipe down hard surfaces using a gentle soap solution and microfiber cloths.
- Clean windows and mirrors with an alcohol-based solution to avoid streaks.
- Tackle fabric seats with baking soda for stains and odors.
- Condition leather seats using a diluted vinegar solution.
- Refresh floor mats and carpets by scrubbing with dish soap or vinegar-based cleaners.
- Remove pet hair easily with damp rubber gloves.
- Clean air vents using gel putty to trap dust and lint.
- Neutralize odors by placing baking soda under a seat.
Regular cleaning not only keeps your car looking great but also improves hygiene, safety, and resale value. Let’s dive into each step to make your car feel like new!
10-Step Guide to Cleaning Your Car Interior at Home
How to Clean Your Car Interior – Step by Step (Beginner Friendly)
sbb-itb-09752ea
1. Clear Out All Trash and Items
Start by completely emptying your car – this means removing everything, including trash and personal items like floor mats, child seats, receipts, and coffee cups. As Cherise Threewitt from The Car Connection explains:
"Everything needs to be removed from the vehicle to properly clean every crevice".
Be thorough: check the glove box, trunk, door pockets, seat pockets, and even under the seats for hidden debris. Slide the front seats forward and backward to uncover crumbs, wrappers, or other items stuck in the tracks. Clearing out the car not only makes cleaning easier but also eliminates potential safety risks, such as loose objects interfering with pedals or blocking your view.
To stay organized, use two containers – one for trash and another for items you want to keep. Important documents can be stored in an expanding file to ensure they stay safe and easy to access.
Once your car is clutter-free, consider adopting habits to maintain it. For example, use silicone baking cups in cup holders to catch spills, and keep a small trash bag in a door pocket that you can empty weekly.
With everything cleared out, you’re ready to tackle cleaning every surface inside your car.
2. Vacuum Every Corner and Crevice
Start by vacuuming every inch of your car’s interior. Handheld vacuums may not have the power you need, so a shop vac with a few horsepower is your best bet. Pair it with the right attachments to tackle different surfaces. Use a crevice tool for tight spaces, an upholstery tool with stiff bristles for fabric seats, and a dusting brush for your dashboard and center console. For those hard-to-reach spots, you can extend the vacuum nozzle by taping a 5/8-inch heater hose to it.
Work systematically, vacuuming from the top down. This way, you’ll catch any dust or debris that falls as you go. Adjust the front seats by moving them up, forward, and backward to expose debris hiding in the tracks. For stubborn crumbs stuck in seams, Threewitt offers this tip:
"Use your fingers to gently pull apart the material near the seams while opening the crevice for the vacuum to get every last crumb".
A headlamp can be a game-changer for spotting dirt under the seats. Don’t forget to vacuum the trunk, door pockets, and storage compartments, as these areas often collect hidden debris. If you’re new to this, expect to spend about 2 to 3 hours for a thorough job – but the results are worth the effort.
Once you’ve vacuumed every corner, your car’s interior will already feel noticeably cleaner.
3. Clean Dashboard and Hard Surfaces
To tackle your dashboard, center console, and other hard surfaces, start with a simple cleaning solution. Mix one tablespoon of liquid dish soap with a gallon of distilled or filtered water in a spray bottle. Using distilled water helps prevent mineral deposits.
Spray the solution onto a microfiber cloth instead of directly on surfaces to avoid overspray. Keep the cloth slightly damp to prevent moisture damage. As you clean, fold the cloth frequently to expose a fresh side, reducing streaks. Finish by buffing the area with a separate dry microfiber towel for a polished, streak-free look.
For those tricky spots where the dashboard meets the windshield, wrap a damp microfiber cloth around a ruler to reach the narrow gaps. Sticky cupholders? Try wrapping a cloth around a travel mug, pressing it into the holder, and twisting gently to clean the bottom and sides. For small details like control knobs and vents, cotton swabs or an old toothbrush work wonders to loosen dirt.
Avoid ammonia-based cleaners entirely. As The Spruce cautions:
"An ammonia-based cleaner can damage interior plastics or dashboard touchscreens, removing anti-glare or anti-fingerprint coatings."
For touchscreens, stick to a microfiber cloth dampened with distilled water. Gently wipe in horizontal motions, applying minimal pressure to avoid damage.
Disinfect high-touch areas with non-bleach wipes. Let the surfaces remain wet for about 5 minutes to ensure proper disinfection before drying. Skip high-gloss protectants on the top of your dashboard – they can create windshield glare, which may obstruct your view while driving.
Once your dashboard and hard surfaces are spotless, you’re ready to move on to the windows for a flawless interior finish.
4. Clean Windows and Mirrors Without Streaks
Clear windows aren’t just about aesthetics – they’re crucial for safe driving. That hazy film on your windows? It’s caused by oily vapors from interior materials, and water-based cleaners simply won’t cut it .
To tackle this, opt for an alcohol-based cleaner, which is safe for anti-glare coatings. Michael Crossen, Lead Auto Technician at Consumer Reports, emphasizes:
"Household products aren’t intended for the finishes you’ll find in modern cars. They may not clean well, and can even cause permanent damage".
Avoid ammonia-based products at all costs – they can strip anti-glare coatings and ruin window tints. Instead, mix your own cleaner by combining equal parts 99% isopropyl alcohol and distilled water for a reliable, streak-free solution.
The Two-Towel Technique
For the best results, use the two-towel method. Spray your cleaner onto a microfiber cloth to avoid overspray on the dashboard. Wipe the glass with the dampened cloth, then immediately follow up with a separate dry waffle weave microfiber towel to buff the surface before the solution dries. Stick to straight vertical or horizontal strokes – this helps prevent swirl marks.
To make streaks easier to spot, use vertical strokes on the interior glass and horizontal strokes on the exterior. Don’t forget to roll your windows down slightly to clean the often-missed top edge. For hard-to-reach areas, like where the windshield meets the dashboard, wrap your microfiber cloth around a ruler to get into those tight spots.
Pro Tips for a Flawless Finish
- Timing Matters: Clean your windows in the shade or when the glass is cool. Direct sunlight can cause the cleaner to evaporate too quickly, leaving streaks behind.
- Tough Residue: For stubborn grime, lightly dampen a Magic Eraser with your alcohol solution. Be cautious around tinted or plastic trim to avoid damage.
Once your windows are spotless, you’re ready to move on to detailing fabric and leather surfaces.
5. Use Baking Soda on Fabric Seats
Baking soda is a simple yet powerful way to clean and deodorize fabric seats. Mary Marlowe Leverette, a housekeeping expert at The Spruce, explains that baking soda can "remove odors and absorb oily stains". Unlike air fresheners that only cover up smells, baking soda works by neutralizing odors at the molecular level.
Before you start, vacuum your seats thoroughly to remove loose dirt and debris. Once the surface is clean, sprinkle a generous layer of dry baking soda evenly over the fabric. For mild odors, let it sit for 15–20 minutes. For more persistent smells, leave it overnight to allow the baking soda to work its magic.
For stains, create a simple cleaning solution by mixing 1/4 cup of baking soda with 1 cup of warm water. Lightly spray this mixture onto the stained area, but be careful not to oversaturate the fabric to avoid mold issues. Use a stiff-bristled brush or an old toothbrush to gently scrub the area. Let the solution sit for about 30 minutes, then vacuum up any residue.
If you’re dealing with a fresh spill, act quickly. Sprinkle baking soda on the spill immediately, vacuum it up after 5–10 minutes, and reapply. Let it sit overnight to absorb any remaining moisture.
Pro tip: For ongoing freshness, keep a vented plastic container filled with baking soda under one of the front seats. Replace the baking soda every month or two for continuous odor control.
Once your fabric seats are fresh and clean, move on to maintaining your leather seats for a consistent, polished interior.
6. Clean Leather Seats with White Vinegar
White vinegar can be an affordable and natural option for cleaning leather seats. But here’s the catch: it needs to be diluted properly. With a pH of about 2.5, undiluted vinegar can strip the protective layer and dry out leather, which starts to break down when exposed to anything with a pH below 4.5.
For modern, coated leather, mix equal parts white vinegar and distilled water. If you’re dealing with older or more delicate leather, go for a gentler mix – one part vinegar to three parts water. Vintage car enthusiast Andre Silva has a word of caution:
"If your leather is finished, delicate, or already dry, even diluted vinegar can accelerate wear".
Before diving in, test the solution on a hidden spot, like a bottom seam, to ensure it doesn’t cause discoloration. Once you’re in the clear, lightly dampen a microfiber cloth with the solution and gently wipe the seats, following the leather’s grain. Never spray the mixture directly onto the seats, especially if they’re perforated – liquid could seep into the foam beneath, leading to mold issues.
After cleaning, wipe the seats with a cloth dampened with plain water to remove any residue. Blot dry, and once the leather is fully dry, apply a conditioner. Let the conditioner soak in for one to four hours to restore the leather’s softness and protection.
Pro tip: Skip cleaning leather in direct sunlight or high heat. The solution can dry too fast, leaving concentrated acid on the surface. For long-term care, clean and condition your leather seats every three months to keep them looking and feeling their best.
With your leather seats refreshed and conditioned, it’s time to move on to the floor mats and carpets.
7. Scrub Floor Mats and Carpets
Start by removing your floor mats and giving them a good shake outside to get rid of loose dirt. Once the mats are out, vacuum the area underneath to pick up any debris.
For rubber mats, mix some warm water with a few drops of dish soap. Use a stiff-bristled brush to scrub away dirt and grime. To rinse, a garden hose works perfectly to wash off the soap and soil.
For fabric or carpeted mats, you’ll need a gentler method. Combine equal parts white vinegar, dish soap, and water in a spray bottle. Spray this mixture over the mat and let it sit for 10–20 minutes to loosen dirt. Then, scrub gently in circular motions. If you’re dealing with tougher stains like oil or wine, make a paste using hydrogen peroxide, baking soda, and dish soap. Apply it to the stain, let it sit for about 30 minutes, and then rinse thoroughly.
Be careful not to soak your mats too much – excess water can lead to mold or unpleasant odors. After scrubbing, wipe them down with a clean microfiber cloth dampened with plain water to remove any leftover soap.
Finally, let the mats air dry completely before putting them back in your car. Hanging them in a sunny, well-ventilated spot is ideal, as reinstalling damp mats can trap moisture and lead to rust or mold issues.
This simple approach is easy on your wallet and doesn’t require any fancy tools, making it a quick and efficient way to freshen up your car’s interior.
8. Remove Pet Hair with Rubber Gloves
Dealing with pet hair in your car? Here’s an easy solution. Pet hair tends to cling stubbornly to seats and carpets, often resisting even the most thorough vacuuming. But a pair of rubber gloves can make all the difference.
Lightly dampen a pair of rubber kitchen gloves with water. This small amount of moisture creates static electricity, which helps attract pet hair. As noted by an expert from Stoner Car Care:
"The mix of friction and moisture builds static, pulling loose hairs together into clumps".
To use this method, sweep your gloved hand firmly in one direction over the seats and carpets. The rubber grips the tiny barbs in the hair, gathering it into clumps for easy removal. This technique works especially well on curved surfaces and in tight spots like seams and around headrests. Apply some pressure to loosen hair that’s deeply embedded in the fabric. Once you’ve collected the hair, follow up with a vacuum to pick up anything left behind.
This trick is far more effective on stubborn pet hair than vacuuming alone. Just be careful not to over-wet the gloves, as excess water can seep into the fabric and lead to mold or unpleasant odors.
Once you’ve tackled the pet hair, you’re ready to move on to other steps for a cleaner, fresher car interior.
9. Clean Air Vents with Gel Putty
Air vents are often a sneaky hiding spot for dust, lint, and even bacteria. Thanks to their narrow slats and tricky angles, they can be tough to clean. That’s where gel putty comes in handy.
This sticky, flexible material molds itself to the shape of your vents. When pressed into the crevices, it grabs onto trapped particles, lifting them out as you peel it away. To use it, gently press the putty into the vent slats, making sure it reaches those tight spaces, and then pull it back to reveal the dirt it’s collected.
Be careful not to press too hard, as you could damage delicate vent components. Aim to clean your vents at least once a year. However, if you often drive with the windows down or in dusty areas, you might need to do it more frequently. Over time, accumulated dirt can harbor mold and pollen, which may get blown into your car’s cabin when the AC is on, potentially causing respiratory discomfort.
Once you’ve used the putty, follow up with a soft detailing brush to sweep away any remaining debris. Not only will your vents look cleaner, but you’ll also notice an improvement in the air quality inside your car.
10. Keep Your Car Fresh with Baking Soda
Once you’ve cleaned and detailed every surface, you’ll want to lock in that freshness. A simple and affordable way to do this is by using baking soda to neutralize odors – not just cover them up.
Baking soda works by absorbing odors naturally, ensuring your car’s interior stays pleasant for days. After handling tough messes like dirt and pet hair, this method helps maintain a clean-smelling environment. Here’s how to do it:
- Take a sturdy container with a ventilated lid and drill a few small holes in the top.
- Fill the container about two-thirds full with baking soda.
- Add a few drops of your favorite essential oil for a subtle fragrance, then shake the container gently.
Place the container under a front seat, where it won’t tip over. Replace the baking soda monthly to keep it effective. If you don’t drive often, you can stretch this to every other month. For stronger odors, you can also apply baking soda directly as described in section 5.
At about $1.00 per box, baking soda is an inexpensive, non-toxic solution that’s safe for kids and pets. It’s a practical choice that keeps your car smelling fresh without breaking the bank.
Conclusion
Transforming your car’s interior can be straightforward and affordable. You don’t need pricey products or professional services to achieve impressive results. With everyday items like baking soda, white vinegar, and dish soap, you can deep-clean your car for as little as $0 to $15. Compare that to spending over $100 on professional detailing. Keith Barry, Senior Autos Reporter at Consumer Reports, puts it perfectly:
"You don’t have to spend $100 or more to bring your car to a detailer or car wash… you can deep-clean your car from your garage or driveway".
Beyond saving money, regular cleaning helps maintain your car’s value for resale or trade-in. It also enhances safety and hygiene by keeping touch surfaces clean, eliminating odors, and ensuring clear visibility.
Consistency is the secret to success. Set up a routine – weekly trash removal, monthly window cleaning, and periodic deep cleans – to keep your car in top shape. Simple habits like using a trash bin or banning food in the car can go a long way in preventing messes. These steps not only protect your interior from wear and tear, like cracking or fading, but also ensure a more comfortable driving experience for years to come.
Start incorporating these tips today for a cleaner, healthier, and more enjoyable ride.
FAQs
How often should I deep-clean my car’s interior?
Experts suggest giving your car’s interior a thorough cleaning every 4 to 6 months to keep it hygienic and preserve the condition of its surfaces. However, if you drive often or your car is exposed to dusty or polluted areas, stepping up to a deep clean every 4 weeks might be a smart move. Keeping up with regular cleaning not only helps maintain your car’s interior but also makes every ride more comfortable and enjoyable.
What household cleaners should I avoid on car interiors?
Avoid using certain household cleaners on your car’s interior, as they can do more harm than good. Here’s what to steer clear of:
- Silicone-based products: These can leave a shiny glare, which might be distracting and even unsafe while driving.
- Dish soap: It may seem harmless, but it strips away protective coatings and can discolor surfaces over time.
- Bleach or ammonia-based cleaners: These are tough on plastics, leather, and screens, potentially leading to cracks or fading.
- Abrasive scrubbers or paper towels: These can leave scratches on delicate surfaces, making your interior look worn.
For the best results, stick with cleaners specifically designed for automotive interiors. They’re formulated to clean effectively without causing damage.
How do I prevent mold after cleaning seats and mats?
To keep mold at bay, make sure your car’s seats and mats are completely dry after cleaning. Let your vehicle sit in sunlight for a few hours to dry out hidden spots and help eliminate mold spores. Placing a small fan inside can boost air circulation and lower humidity levels. Also, make it a habit to air out your car regularly and quickly dry any damp carpets or mats to stop mold from coming back.
Related Blog Posts
- 7 Winter Car Care Tips for South Africa
- 5 Tips To Save On Fuel Costs In South Africa
- How to Extend the Life of Your Used Car in SA
- Ultimate Guide to Buying Used Family Cars


